Mastering the Japan Rail Pass: Your Step-by-Step Guide
May 17, 2025
I use the word “mastering” loosely as I’m not sure that anyone can actually “master” the Japan Rail Pass, but after a handful of mistakes, we would label ourselves to be proficient enough.
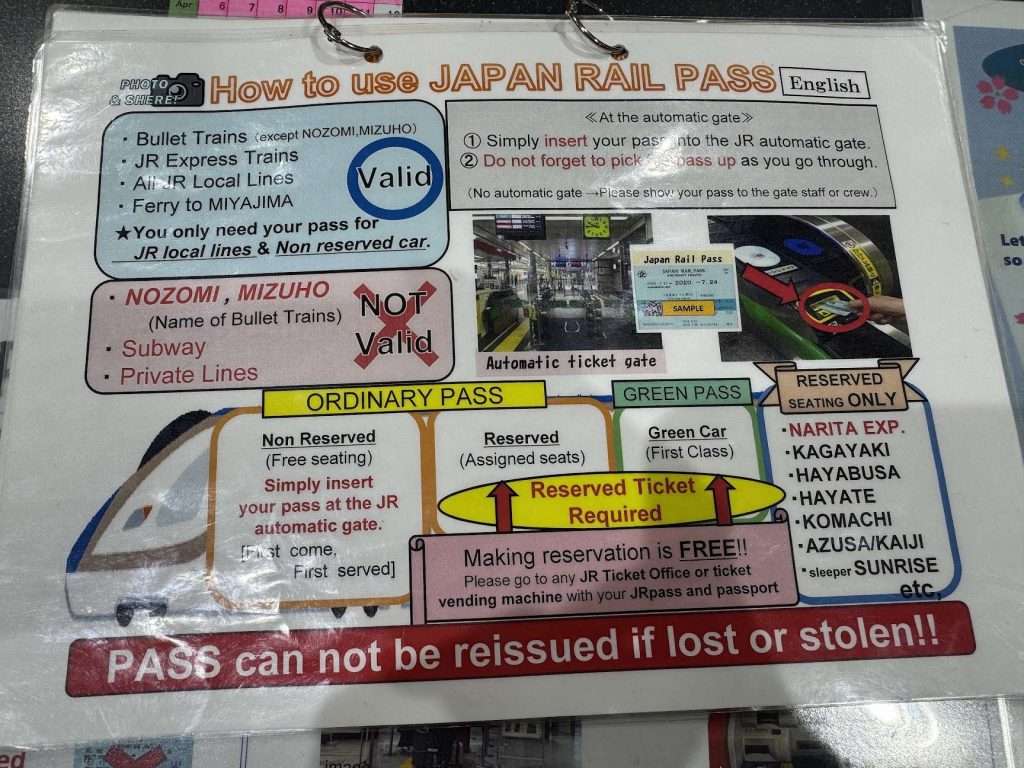
Just in case you are unaware, the Japan Rail Pass (JR Pass) is a special ticket that is only available to foreigners. I’m not completely convinced that we are actually paying a premium for something that locals get for much less, but whatever, it is what it is. Anyway the JR Pass grants the pass holder unlimited rides on JR trains across Japan including the Shinkansen (bullet train), limited express, rapid, and local trains. One is able to purchase the pass to use for 7, 14, or 21 consecutive days.
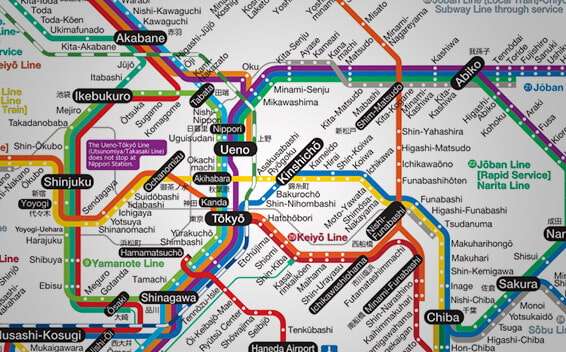
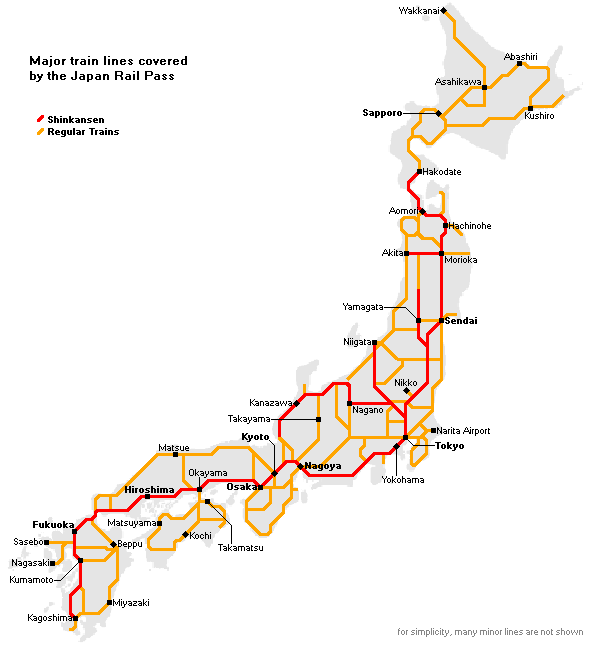
The trains will take you to many of the more popular cities in Japan as you can see in the (simple) map below.
I, personally, did not find a ton of helpful information on using the train to travel Japan. As a result I purchased the book Train Japan: The Essential Rail Guide to Japan. While this book would be excellent for someone who enjoys train spotting, it did not cover the more essential topics like “how to actual purchase and use the JR Pass”. So I will do my best to explain what we learned here.
How and When to Purchase your JR Pass
You are UNABLE to purchase a JR Pass once you arrive in Japan. In fact, you will need to order it no more than 30-days from your activation date (date to start the pass), but with enough time to receive the “voucher”, delivered via FedEx, to your home address.
Many of my friends who left for Japan after we returned, did not know that they needed to pre-purchase the pass. We have used public transportation in many parts of the world and have never needed to plan this far in advance, but again, Japan is unique…in many ways.
I purchased our JR Pass here: https://www.jrailpass.com/. We paid $509 for each adult (this included our 13-year old) and $254 for our 10-year old on a 7-day pass. We purchased the Green Pass (First Class).
Do I need a Green Pass?
If you are trying to save money, you could choose to NOT purchase a Green Pass, but the JR isn’t all that cheap to begin with so what is another $150 to love the life of luxury? (Standard pass is $364 and $181 for a child.)
Traveling with the Green Pass is glamorous — better than a first class seat on an airplane. The bathrooms are pristine and they have trash cans which, you will learn, is a novelty in Japan. If you are traveling with your family, the green pass allows you to reserve a seat in advance so that you do not need to worry about being separated from your kids. (Although on the weekend when we were late making a reservation we did have to spread out across two rows.)
Activating your JR Pass
Do this before you leave the airport. We arrived at Tokyo’s Narita Airport and proceeded downstairs to the well marked JR Desk to activate the pass. You will need to bring the paper “voucher” that you received in the mail when you were in the United States and your passports to the desk. Only one person will be allowed into the office, while the rest of you will stay with the luggage. You need to know the exact date that you plan to activate the pass. This cannot be adjusted later. We arrived on a Saturday and planned to activate the pass on a Monday. As a result, with our 7-day pass we needed to be back in Tokyo by midnight on the Sunday night.
The Japan Rail Pass
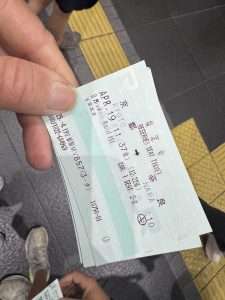
Finally you are given your JR pass. The pass is a very small green paper ticket, that a child or adult could easily lose or misplace. Guard this ticket with your life. If you lose the ticket, it will probably cost you more time and money than if you had lost your passport. For $509 I was expecting something more passport sized, laminated, and attached to a fancy lanyard.
Funnily enough, you will soon find out that the JR pass looks identical to the ‘seat reservation’ tickets that you will soon receive when you reserve a seat with your activated pass.

In short, do NOT lose this ticket. Do NOT let your kids hold their own ticket. Heck, don’t even let your husband hold his own ticket. You have been warned.
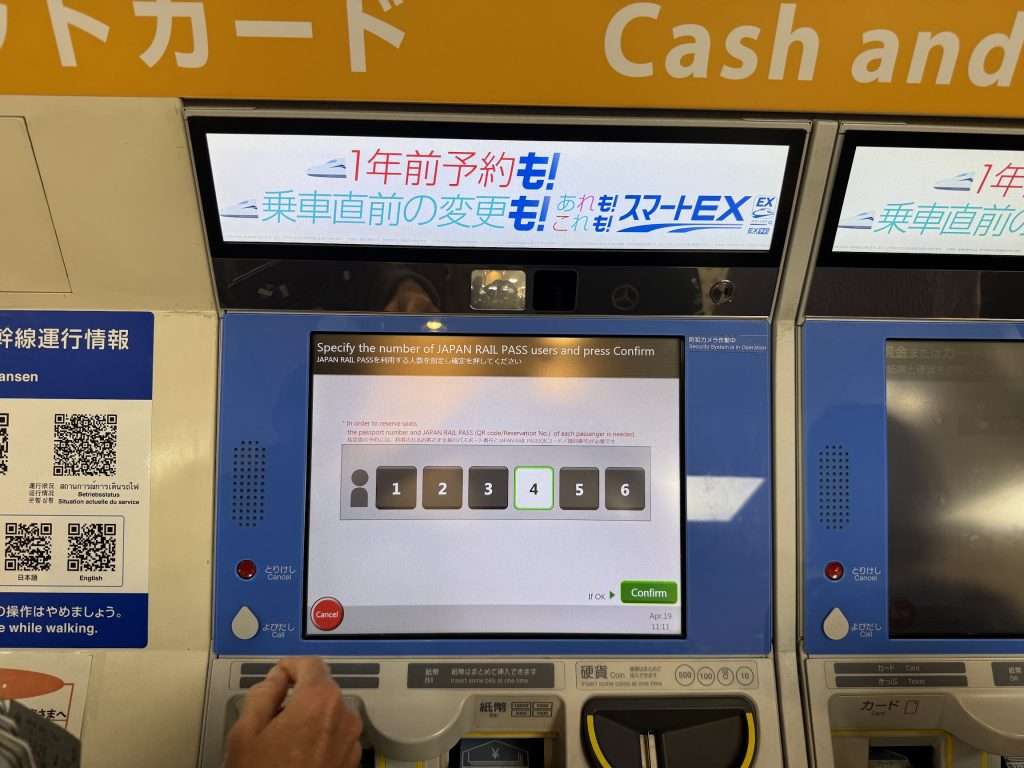
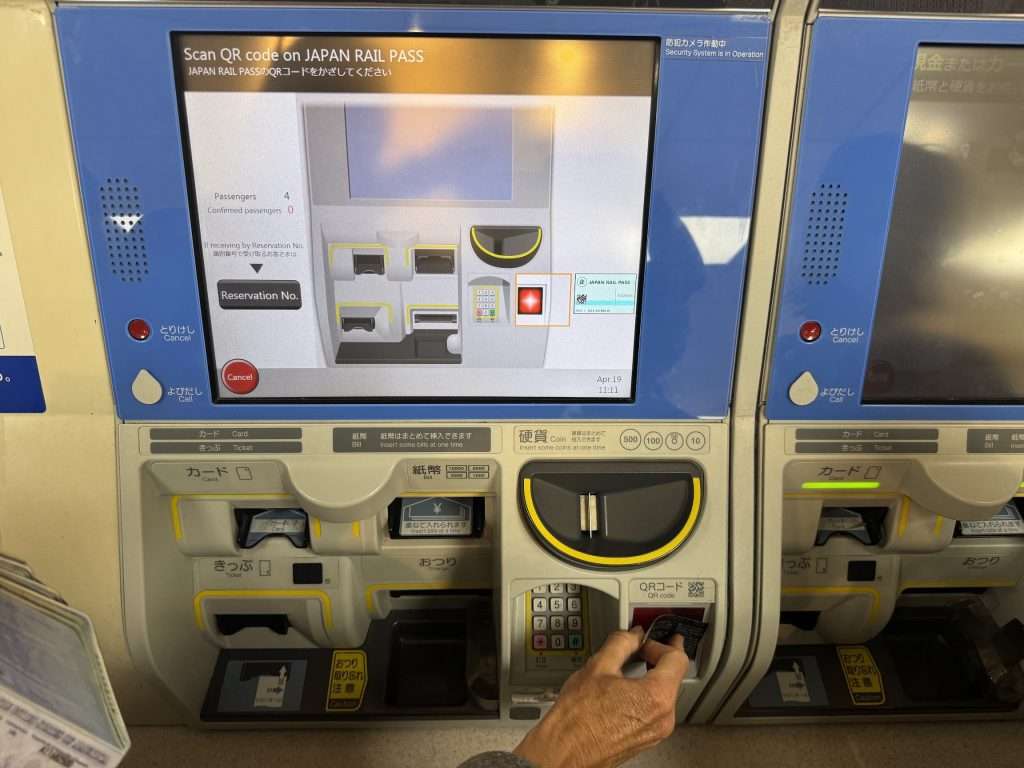
NOTE: The number circled in red is what you use to determine whose JR Pass this belongs to. “1533”, for example, are the last four digits of Greg’s passport number. You will need to know this for STEP 6 and STEP 7 in the section “Reserving a Seat” below.
Getting Into Tokyo
We used the ATM at the airport to purchase Japanese Yen. $100 Yen = $1 USD roughly. Between our credit card and withdrawing $40,000 Yen ($400) we navigated the country for ten days leaving with only a handful of yen in our pocket (souvenirs). Charles Schwab is our bank and one of the perks they offer is that all of our ATM fees were refunded.
Next it was time to make our way into Tokyo. Using our newly acquired cash, we purchased the Keisei Skyliner Narita Airport Express Ticket and a 48-hour Tokyo Metro pass for each of us. (The combo ticket + paying cash resulted in some small savings.) The Skyliner was super convenient, delivering us to the Keisei Ueno Station in 45-minutes. From here we took the Orange line to Asakusa Station where we were staying.
Using the Japan Rail Pass
Sunday was spent touring Tokyo, using our 48-hour Tokyo Metro pass. We activated our 7-day JR Pass on Monday from Tokyo Station. Tokyo Station is enormous and very crowded. We entered from the street and walked for twenty or thirty minutes underground before we actually reached the station. On a Monday morning there are a LOT of people, and most of them are NOT “Westerners”.
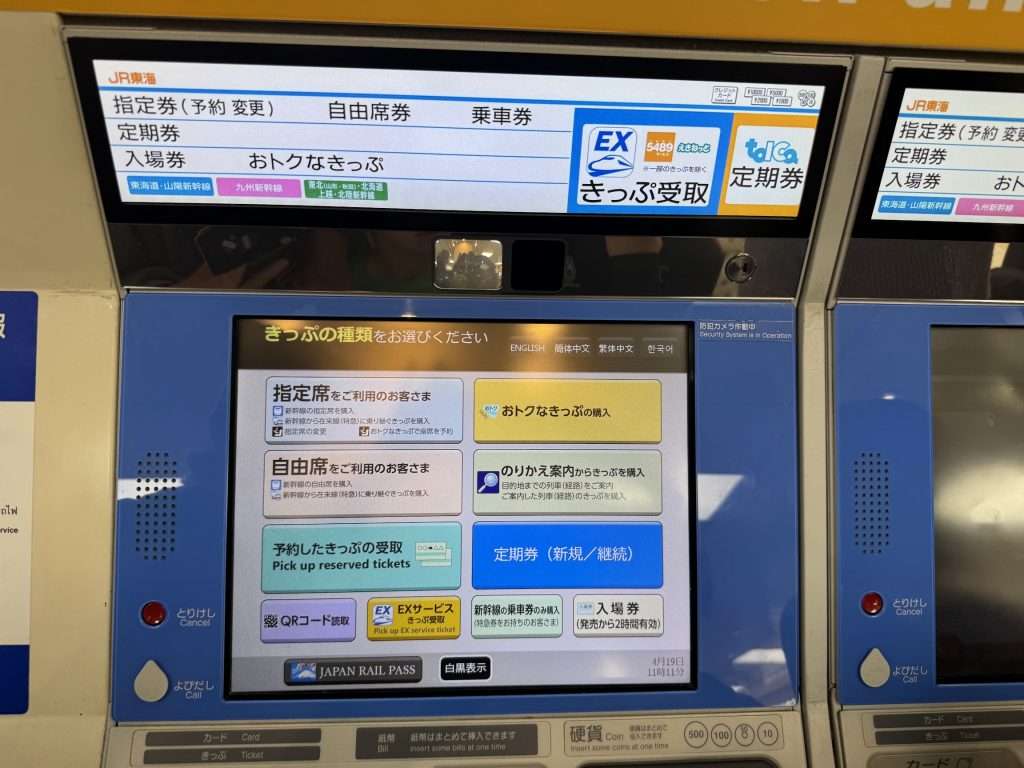
While the signs do have English translations below the Japanese characters, they are only moderately useful. As for the advertised English speakers at the Information booths? Not so much. If you speak primarily with gestures, you may be able to get them to point you in the rough direction.
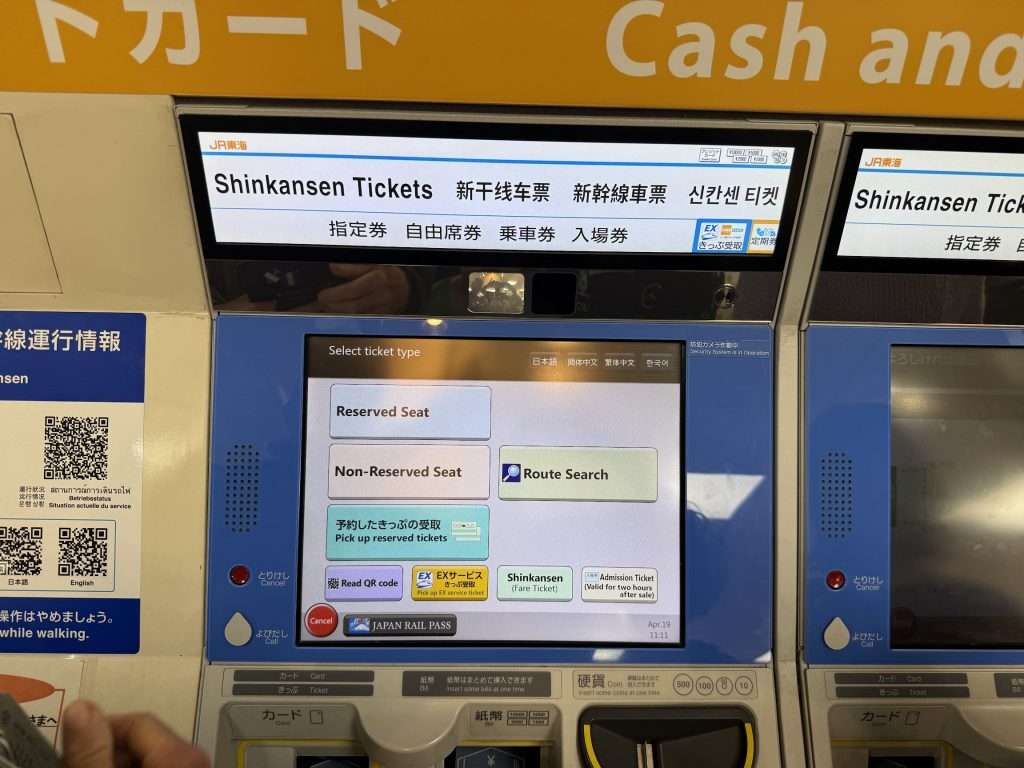
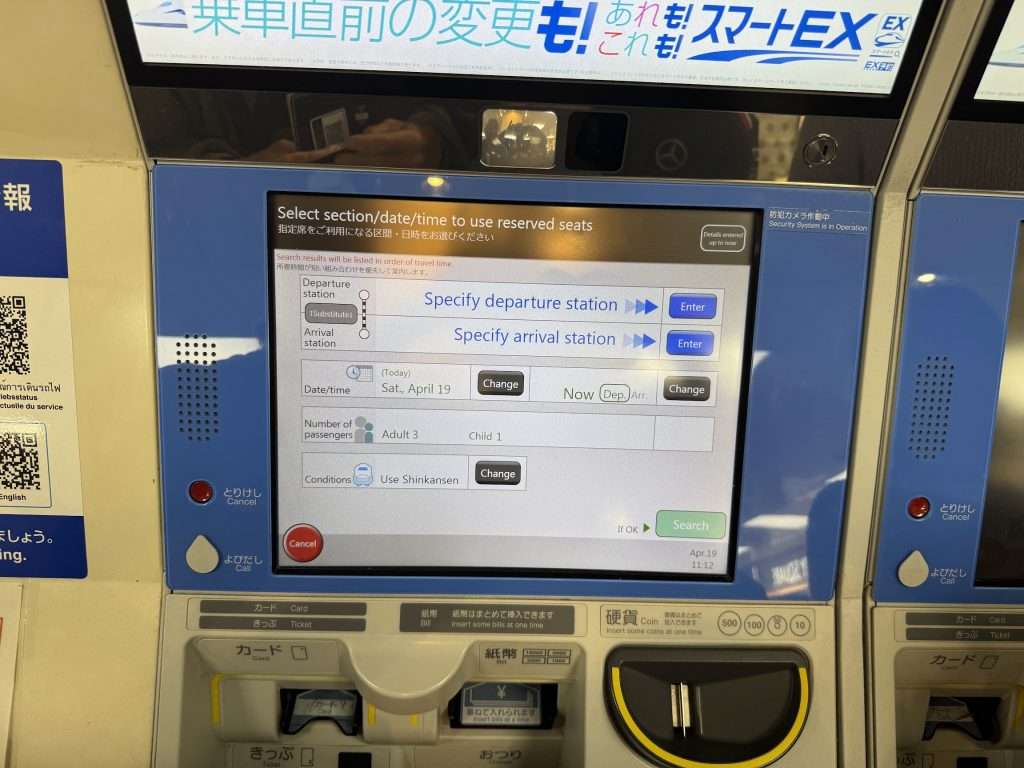
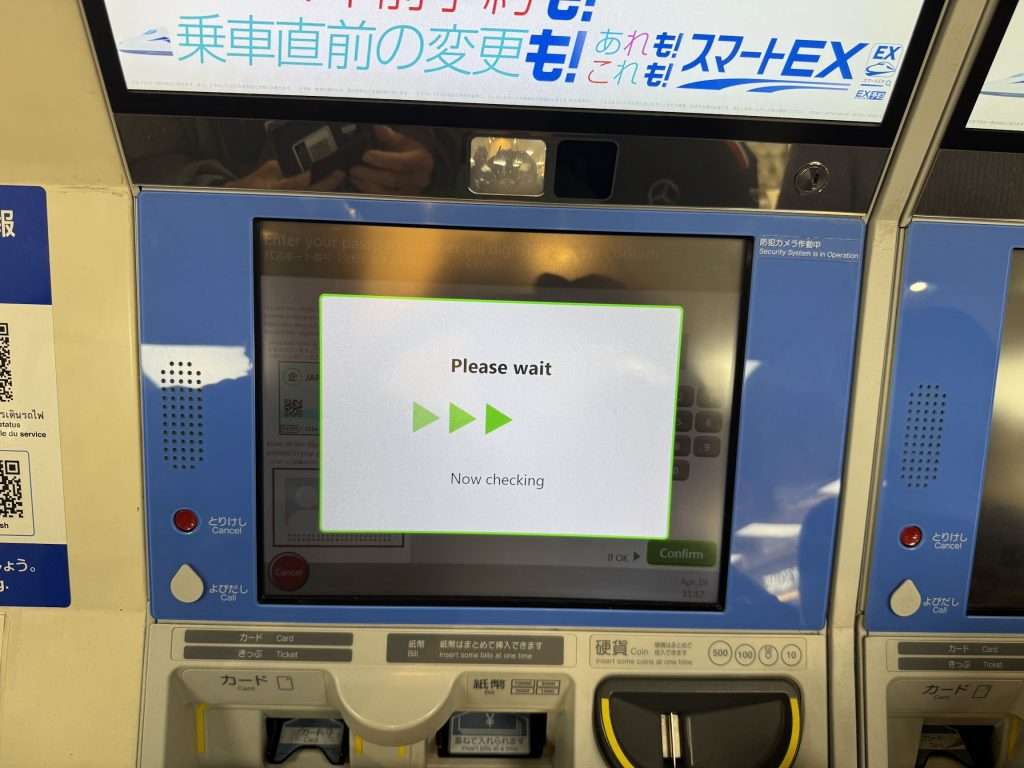
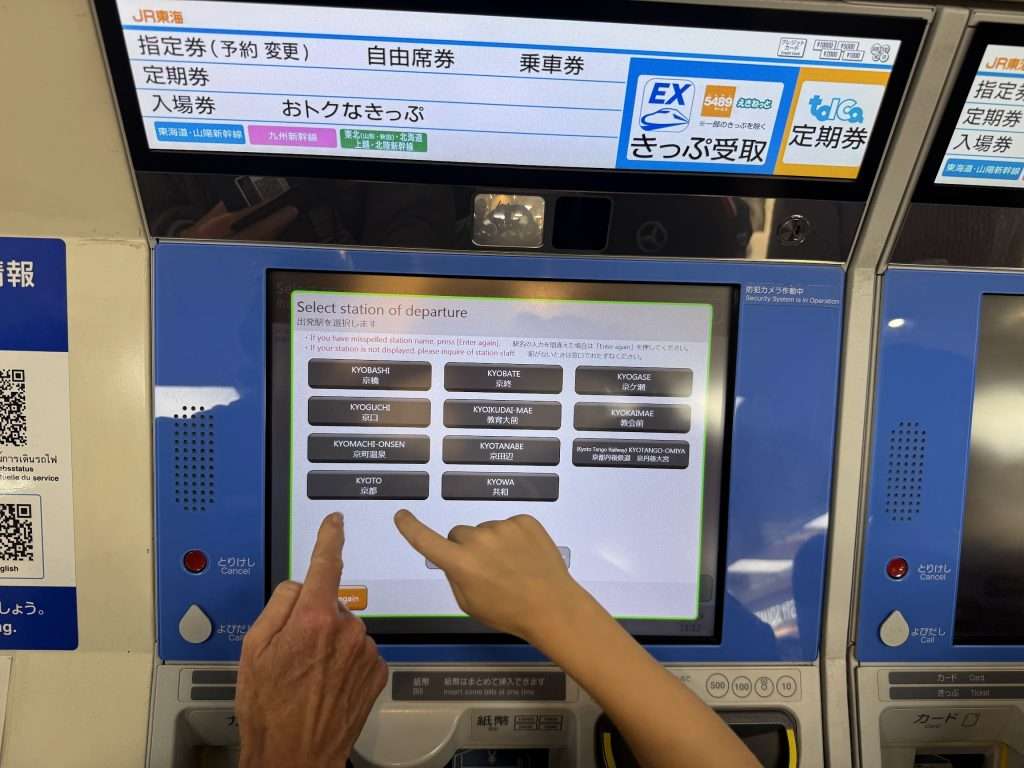
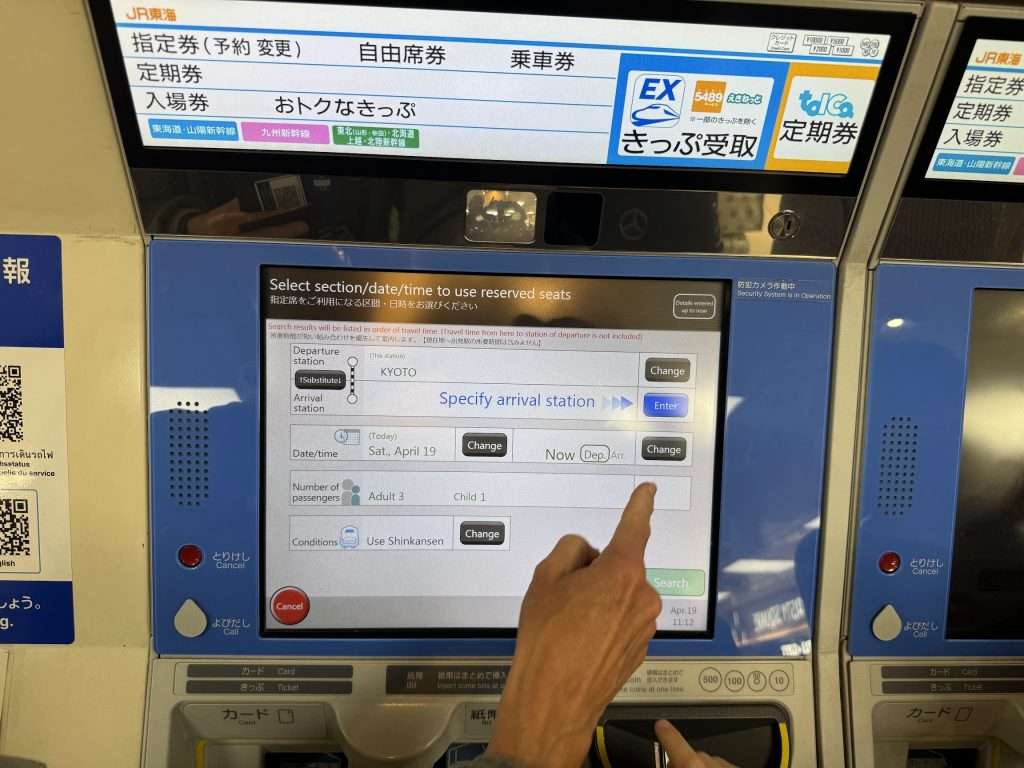
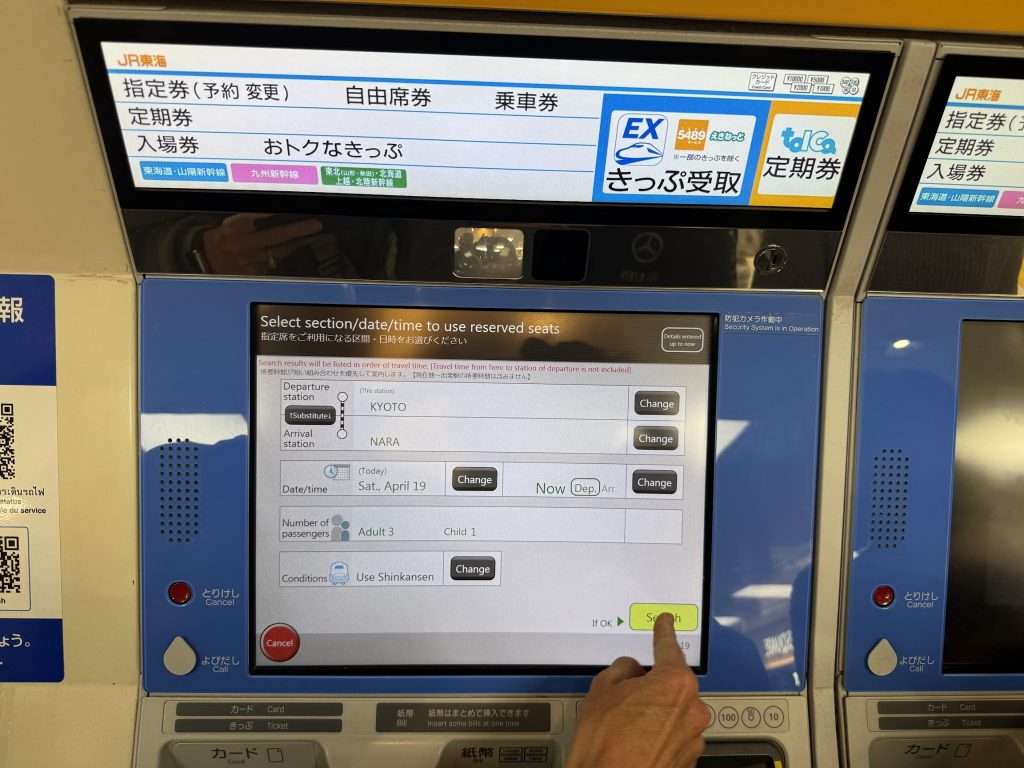
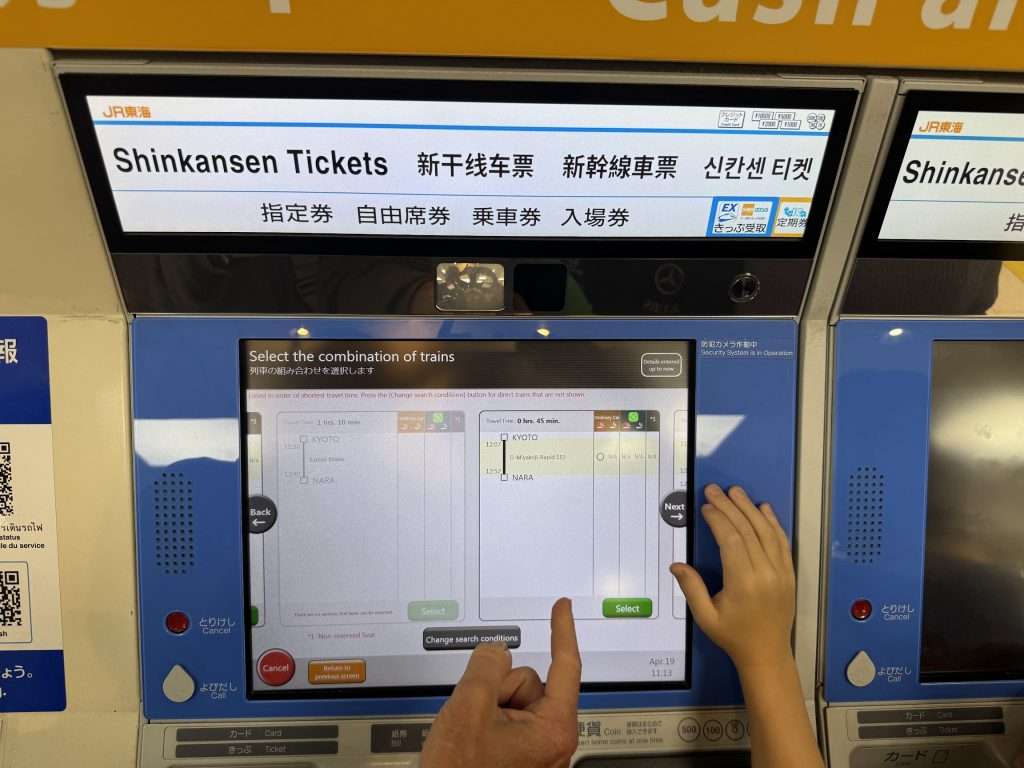
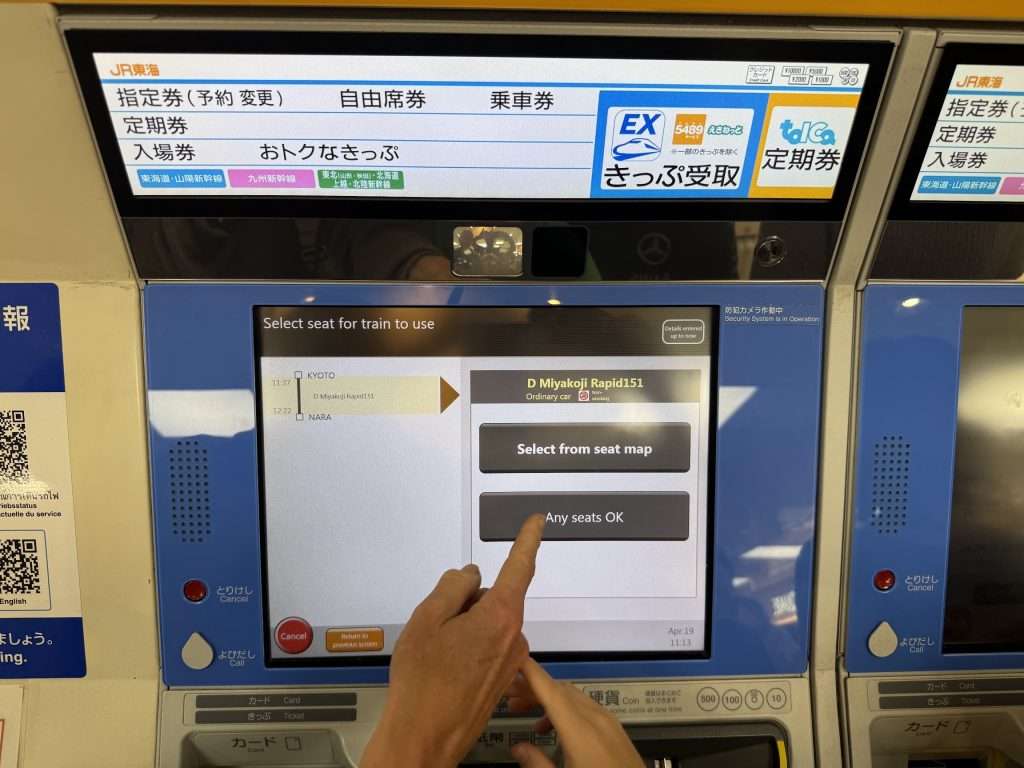
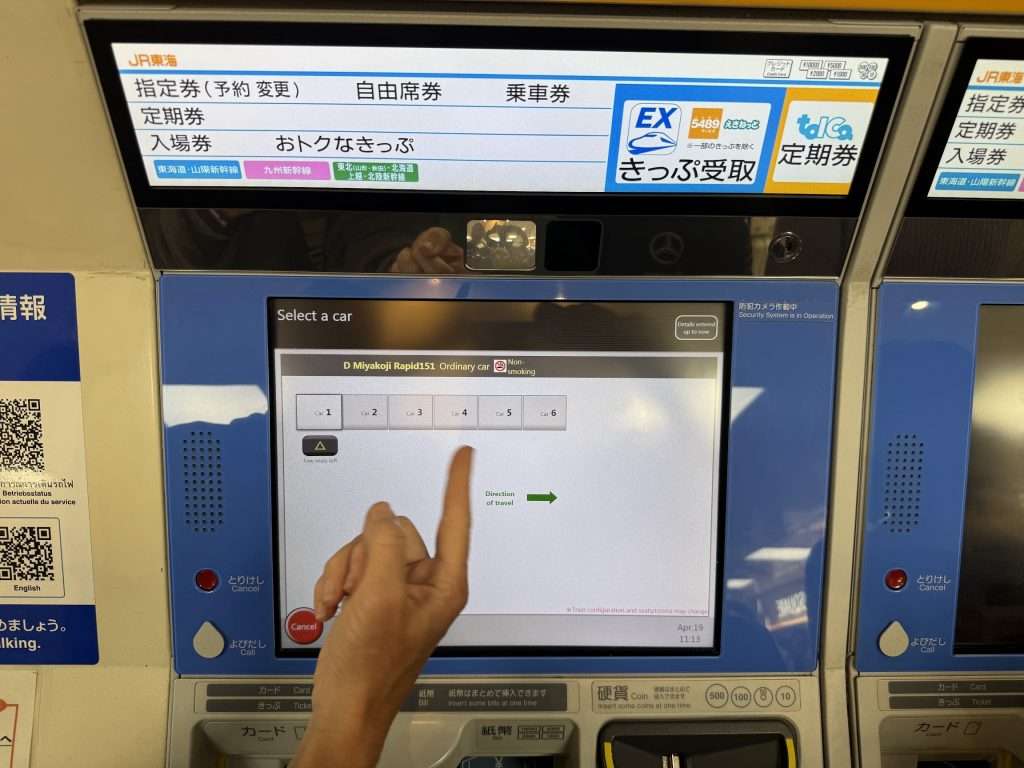
As for the kiosks used to reserve a seat, you are left with the directions in the image below unless you are fortunate enough to have an English speaker take pity on you and show you the ropes. (This happened to us and then I tried to ‘pay it forward’ to all the other confused tourists that were behind me in line.
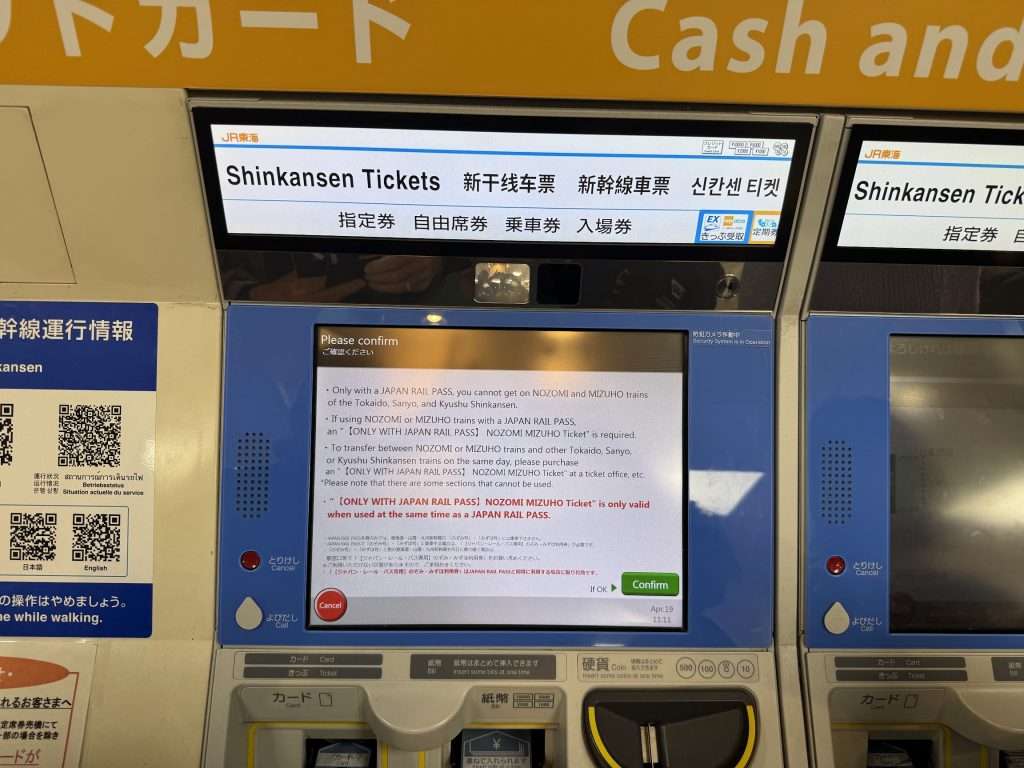
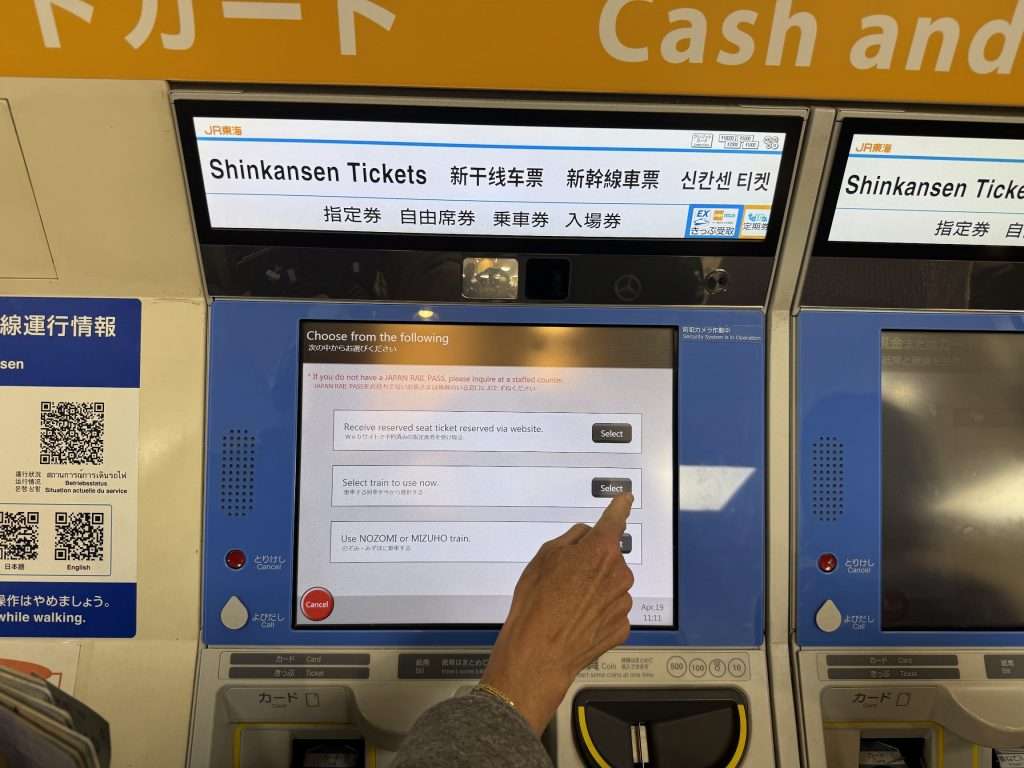
Reserving a Seat – STEP BY STEP Instructions
The Green Pass allows you to reserve a seat. This is useful because then you know exactly where to board and where to sit on the train – particularly the longer routes where it matters more. It will also allow you to reserve “luggage seats” when you are traveling with something larger than a small backpack as that is considered “oversized”.
Starting on a Monday, we had no problem reserving seats on the trains that we wanted. We quickly learned that all of that changes on a Friday. If you are using the JR on the weekends, I would suggest reserving your seats ahead of time – particularly if you are traveling with luggage on Kyoto -> Tokyo routes.
After several days struggling with the complexities of the Seat Reservation process, we decided to take pictures and share them so that anyone else navigating the Japan Rail would have a little edge.


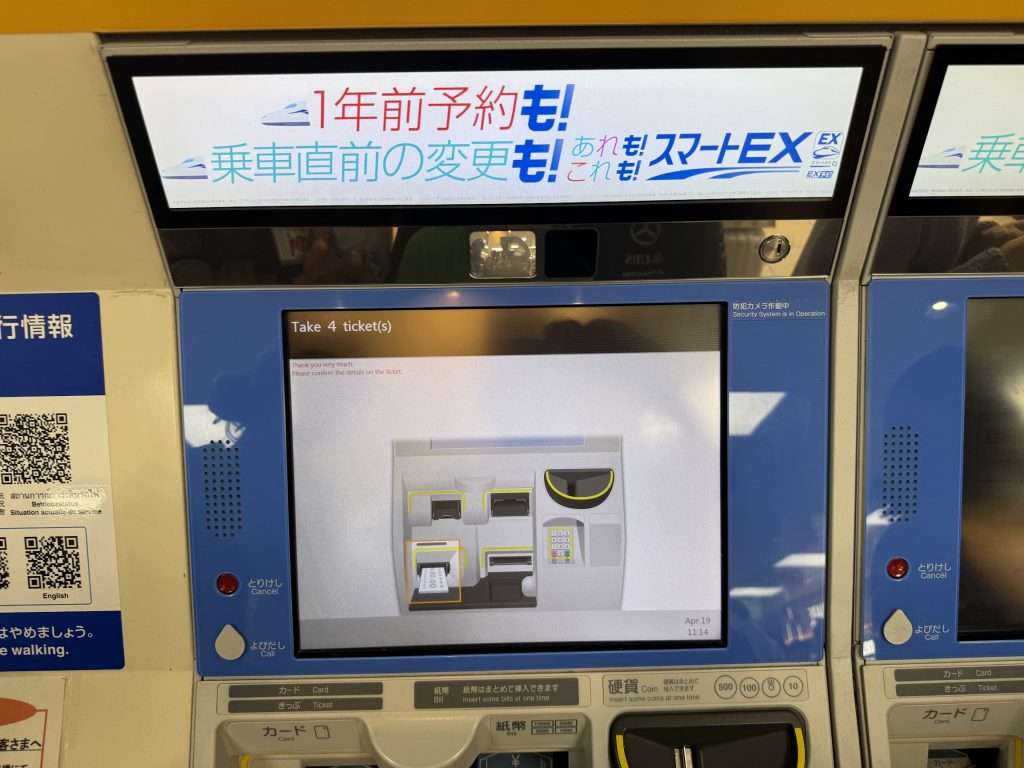
The final result is a printed seat reservation ticket that looks IDENTICAL to your Japan Rail Green Pass. Go figure. Now if you lose this ticket, it is not nearly as catastrophic as losing your JR Pass. You just won’t know which train or seat you are on/meant to sit in. You will then just need to go through STEP 1 through STEP 19 again (4 times for STEP 6 AND STEP 7) and get a new train/seat.
Finding your Train
With a JR Pass and a seat ticket in hand, it is now time to find your train. The ticket with the seat reservation will have the time that the train leaves, your seat information, the name of the train, and the destination. It will NOT say the platform number. Nor will it tell you if you are on a Shinkansen, a local train, limited express, etc. You are left to figure that out on your own, which is a challenge in the chaos of Tokyo Station.
At Tokyo Station, we relied on the woman working at the Disney Store adjacent to the ticketing kiosks. Each time we found ourselves trying to locate our platform, we showed her our ticket, and she was able to give us directions. Had it not been for her, we would have missed every train we tried to get on I think.
I can’t help much on this topic other than to say that if the ticket says something like: Nozomi, Hikari, or Kodama you will need to follow the signs for the Shinkansen.
Oh, and the trains will leave on time. You can set your watch by the Japanese trains.